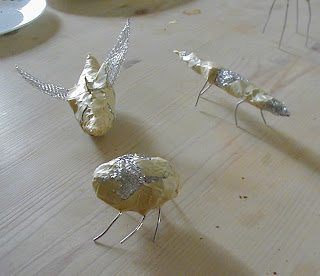
My first experiments with paper clay


Recently, I spent some time with my family in Massachusetts. The trip was unexpected, and unfortunately involved a serious medical emergency. I am happy to share that my Mom is recovering well from her recent health excitement.
I find that such events result in some residual stress that needs dealing with. One effective way I deal with my stress is by making things. I find working with my hands and mind in this way to be very calming and meditative. So though I felt I had many "more important" things to accomplish upon my return, I began setting aside time for at least a half hour a day of work on a brand new project.
Sometimes I think that a whole new set of materials can be a great way to 'jump start' the ol' art brain. At the same time, the challenges of figuring out a new medium can take your mind floating away from your worries for the time being.
I have always struggled with the world of sculpture. For many years I hung out in the safety and familiarity of the 2-D. What has been really magical about this project is that for the first time ever, I enjoyed making the armatures (the frameworks around which each sculpture is built). I tinkered with the foil, the masking tape, and the wonderful wire mesh that I got a few years back when inspired by a sculptor friend. At first I had found that mesh unweildy and even hurtful, its rough little edges poking into my fingers with unpleasant pain! However, this stuff can be stretched and molded in ways I hadn't imagined.
So here I'll share the first step: The armatures, and the beginnings of building with the paper clay. (Please excuse the crumbs on the table, I was too exited to take a picture). The blobby rock shapes do NOT contain armatures, nor do the fish shape and other shapes which lay flat against the board.
The material I am using is basically paper mache. However, unlike the strips of newspaper so many of us fought with back in grade school, this recycled paper has been ground to a powdery substance and contains its own adhesive. "Just add water"! The product is called Activa Celluclay, and there are instructive videos on the company's website (which are also entertainingly dated, apparently the product has been around for a while!)
At first, I was using the material at a consistency that kind of reminded me of tuna fish. Later I learned to add a little more water, and put water on my finger before smoothing the material on to the armature.
Please let me know if you have any questions about making the armatures, and I'll attempt to go into more depth. Next time I'll post some more pictures of the sculptures along the way to completion.


